Player settings for QNX
The Player settings window contains settings that determine how Unity builds and displays your final application. You can use the PlayerSettings API to control most of the settings available in this window.
General settings
The Player settings differ between the platform modules that you have installed. Each platform has its own Player settings which you must set for each version of your application you want to build. To navigate between them, click the tabs with the appropriate platform operating system icon.

You can find documentation for the properties in the following sections:
Icon
Enable the Override for QNX setting to assign a custom icon for your QNX game.
Resolution and presentation
Use the Resolution and Presentation section to customize aspects of the screen’s appearance in the Resolution and Standalone Player Options sections.
Resolution section
This section lets you customize the screen mode and default size.
| Function | Description |
|---|---|
Use 32-bit Display Buffer | QNX only supports 32-bit color buffers. |
| Disable Depth and Stencil | This isn't supported on QNX platform. |
Render Over Native UI | This isn't supported on QNX platform. |
Splash Image
The Virtual Reality Splash Image setting is used for selecting a custom splash image for Virtual Reality (VR) displays. However, it doesn't apply to QNX platform.
Other Settings
This section allows you to customize a range of options organized into the following groups:
Rendering
Use these settings to customize how Unity renders your game for the QNX platform.

| Function | Description | |
|---|---|---|
Color Space | Choose which color space Unity uses for rendering: Gamma or Linear. Refer to the Linear rendering overview for an explanation of the difference between the two.
| |
| Multithreaded Rendering | Enable this option to use multithreaded rendering. This is only supported on Metal. | |
Static Batching | Enable this option to use Static batching. | |
Dynamic Batching | Enable this option to use Dynamic Batching on your build (enabled by default). Note: Dynamic batching has no effect when a Scriptable Render Pipeline is active, so this setting is only visible when nothing is set in the Scriptable Render Pipeline Asset Graphics setting. | |
Static Batching Threshold | Controls the maximum vertex threshold used when batching. For more information, refer to Sprite Batch Vertex Threshold. | |
| GPU Compute Skinning | Enable this option to enable DX11/ES3 GPU compute skinning, freeing up CPU resources. | |
Graphics Jobs | Enable this option to instruct Unity to offload graphics tasks (render loops) to worker threads running on other CPU cores. This is intended to reduce the time spent in | |
Texture compression format | Choose the texture compression format to use for textures in your Project. The options are ETC, ETC2, ASTC, DXT, and PVRTC. For more information on each of these compression formats, refer to TextureImporterOverride. | |
Normal Map Encoding | Choose Normal Quality or High Quality to set the lightmap encoding. This setting affects the encoding scheme and compression format of the lightmaps. | |
Lightmap Streaming | Enable this option to load only the lightmap mipmaps as needed to render the current game Cameras. This value applies to the lightmap textures as they're generated. Note: To use this setting, you must enable the Texture Streaming Quality setting. | |
Streaming Priority | Set the lightmap mipmap streaming priority to resolve resource conflicts. These values are applied to the lightmap textures as they're generated. Positive numbers give higher priority. Valid values range from –128 to 127. | |
Frame Timing Stats | Enable this option to gather CPU/GPU frame timing statistics. | |
OpenGL: Profiler GPU Recorders | Enable profiler recorders when rendering with OpenGL. | |
Virtual Texturing (Experimental) | Indicates whether to enable Virtual Texturing. Note: The Unity Editor requires a restart for this setting to take effect. | |
| 360 Stereo Capture | Indicates whether Unity can capture stereoscopic 360 images and videos. When enabled, Unity compiles additional shader variants to support 360 capture (currently only on Windows/OSX). When enabled, enable_360_capture keyword is added during the Stereo RenderCubemap call. Note that this keyword isn't triggered outside the Stereo RenderCubemap function. For more information, check Stereo 360 Image and Video Capture. | |
Load/Store Action Debug Mode | Highlights undefined pixels that might cause rendering problems on mobile platforms. This affects the Unity Editor Game view, and your built application if you select Development Build in Build Settings. Refer to LoadStoreActionDebugModeSettings for more information. |
Configuration
| Function | Description | |
|---|---|---|
| Scripting Backend | You cannot change the scripting backend for QNX. | |
| API Compatibility Level | Choose which .NET APIs you can use in your project. This setting can affect compatibility with third-party libraries.
Tip: If you are having problems with a third-party assembly, you can try the suggestion in the API Compatibility Level section below. | |
| IL2CPP Code Generation | Defines how Unity manages IL2CPP code generation. Note: To use this, set Scripting Backend to IL2CPP. | |
| C++ Compiler Configuration | Choose the C++ compiler configuration used when compiling IL2CPP generated code. Note: This property is disabled unless Scripting Backend is set to IL2CPP. | |
| Use incremental GC | Enable this to use the incremental garbage collector, which spreads garbage collection over several frames to reduce gc-related spikes in frame duration. | |
| Allow downloads over HTTP | Indicates downloading content over HTTP is allowed or not. The default option is Not allowed due to the recommended protocol being HTTPS, which is more secure. Choose one of the following options:
| |
| Player Data path | Enter the directory path on the system where you want to save the . | |
| Log startup Timings | Enable this option to log the startup of the player. | |
| CPU Configuration | Set the target CPU configuration for the player runtime. The default number of cores is 0, but you can increase it by entering a number. The options for each of the CPU are: Disabled, High Performance, and Low Performance. | |
| Loading image | Use this setting to select a custom splash image for the loading screen. | |
| Screen graphics config path | Enter the directory path on the system where you want to save the .config and log files. | |
| Active Input Handling | Choose how you want to handle input from users.
|
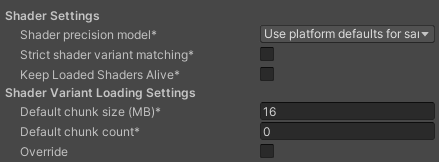
Shader Settings and Shader Variant Loading Settings
Use these settings to control how much memory shaders use at runtime.
| Property | Description |
|---|---|
| Shader precision model | Select the default precision of samplers used in shaders. For more information, refer to Shader data types and precision. |
| Strict shader variant matching | Use the error shader if a shader variant is missing and display an error in the console. |
| Keep Loaded Shaders Alive | Keep all loaded shaders alive and prevent unloading. |
| Default chunk size (MB) | Sets the maximum size of compressed shader variant data chunks Unity stores in your built application for all platforms. The default is 16. For more information, refer to Shader loading. |
| Default chunk count | Sets the default limit on how many decompressed chunks Unity keeps in memory on all platforms. The default is 0, which means there’s no limit. |
| Override | Enable this to override Default chunk size and Default chunk count for this build target. |
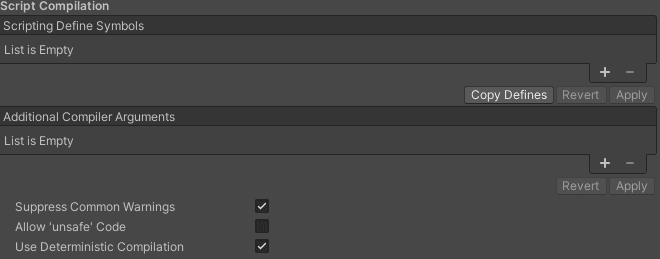
Script Compilation
| Function | Description |
|---|---|
| Scripting Define Symbols | Set custom compilation flags. For more details, refer to the documentation on Platform dependent compilation. |
| Additional Compiler Arguments | Add entries to this list to pass additional arguments to the Roslyn compiler. Use one new entry for each additional argument. To create a new entry, press the ‘+’ button. To remove an entry, press the ‘-’ button. When you have added all desired arguments, click the Apply button to include your additional arguments in future compilations. The Revert button resets this list to the most recent applied state. |
| Suppress Common Warnings | Disable this setting to display the C# warnings CS0169 and CS0649. |
| Allow ‘unsafe’ Code | Enable support for compiling ‘unsafe’ C# code in a pre-defined assembly (for example, Assembly-CSharp.dll). For Assembly Definition Files (.asmdef), click on one of your .asmdef files and enable the option in the Inspector window that appears. |
| Use Deterministic Compilation | Disable this setting to prevent compilation with the -deterministic C# flag. With this setting enabled, compiled assemblies are byte-for-byte identical each time they're compiled. For more information, see Microsoft’s deterministic compiler option documentation. |
Optimization
| Function | Description |
|---|---|
| Prebake Collision Meshes | Enable this option to add collision data to Meshes at build time. |
| Preloaded Assets | Set an array of Assets for the player to load on startup. To add new Assets, increase the value of the Size property, then set a reference to the Asset to load in the new Element box that appears. |
| Managed Stripping Level | Choose how Unity strips unused managed (C#) code. The options are Disabled Low, Medium, and High. When Unity builds your app, the Unity Linker process can strip unused code from the managed DLLs your Project uses. Stripping code can make the resulting executable significantly smaller, but can sometimes accidentally remove code that's in use. For more information about these options, refer to Managed code stripping. For information about bytecode stripping with IL2CPP, refer to Managed bytecode stripping with IL2CPP on the same page. |
| Vertex Compression | Choose the channel that you want to set for compressing meshes under the vertex compression method, which by default, is set to Mixed. This affects all the meshes in your project. Typically, Vertex Compression is used to reduce the size of mesh data in memory, reduce file size, and improve GPU performance. For information on how to configure vertex compression and limitations of this setting, refer to compressing meshes. |
| Optimize Mesh Data | Selecting this option enables stripping of unused vertex attributes from the mesh used in a build. This reduces the amount of data in the mesh, which might help reduce build size, loading times, and runtime memory usage. However, you must remember to not change material or shader settings at runtime, if you have this setting enabled. Refer to PlayerSettings.stripUnusedMeshComponents for more information. |
| Texture MipMap Stripping | Enable this option to enable mipmap stripping for all platforms, which strips unused mipmaps from Textures at build time. Unity determines unused mipmaps by comparing the value of the mipmap against the Quality Settings for the current platform. If a mipmap value is excluded from every Quality Setting for the current platform, then Unity strips those mipmaps from the build at build time. If QualitySettings.masterTextureLimit is set to a mipmap value that has been stripped, Unity will set the value to the closest mipmap value that hasn't been stripped. |
Logging
Select what type of logging you want to allow in specific contexts within the QNX builds.
Select your preferred logging method from the available options.
Check a box that corresponds to each Log Type (Error, Assert, Warning, Log, and Exception) based on the type of logging you require. For example:
- ScriptOnly: Logs only when running scripts.
- Full: Logs all the time.
- None: No logs are ever recorded.
Legacy
| Function | Description |
|---|---|
| Clamp BlendShapes (Deprecated) | Enable the option to clamp the range of blend shape weights in SkinnedMeshRenderers. |
| Upload Cleared Texture Data | This is a legacy feature and currently not needed because it uses up the bandwidth. By default, this is enabled for debugging purposes. Enabling this setting clears the initial data and automatically uploads the Texture from script to the video memory. |